How to Connect to RDP from MacOS: A Step-by-Step Guide
If you’re using a MacBook and need to access a remote computer, you might be looking for a way to connect via RDP (Remote Desktop Protocol). This method allows you to remotely control a Windows or Linux server, access files, and collaborate on projects from anywhere. In this guide, we’ll show you how to easily connect to RDP using your MacBook.
What is RDP?
RDP, or Remote Desktop Protocol, is a technology created by Microsoft that lets you connect to another computer over a network or the internet. Once connected, you can access the remote system’s desktop, files, applications, and more, just as if you were sitting right in front of it. To connect to RDP on a Mac, you will need to use an app like Microsoft Remote Desktop, available for free on the Mac App Store. Let’s walk through the process of setting up and connecting to RDP on your MacBook.
How to Connect to RDP on a MacBook: A Simple Guide
Follow these easy steps to connect to RDP from your MacOS:
1. Install Microsoft Remote Desktop App
-
Open the Mac App Store on your MacBook.
-
Search for “Microsoft Remote Desktop.”
-
Download and install the app.
-
Once installed, launch the app. It’s designed specifically for macOS, making it easy and efficient to use.
2. Gather Your RDP Credentials
Before you can connect, you’ll need a few key details:
-
IP Address or Hostname: This is the address of the remote computer or server you wish to access.
-
Username & Password: These are the login credentials for the remote machine.
-
Port Number (Optional): The default RDP port is 3389, but you may need this if the remote system uses a different one.
If you’re unsure about any of these details, you can check with your IT department or service provider for assistance.
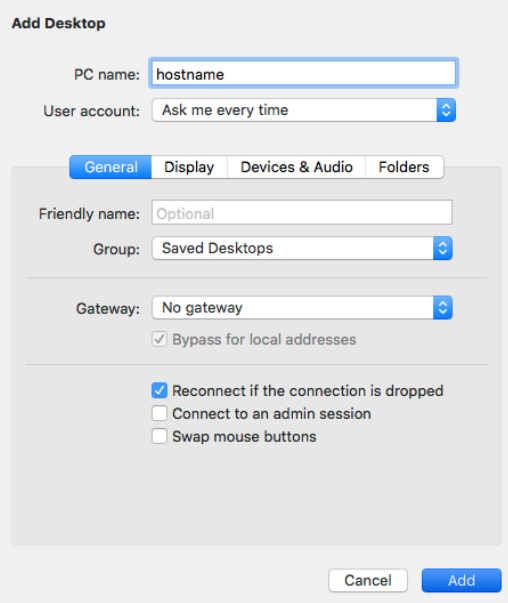
3. Add a New Connection
-
Open the Microsoft Remote Desktop app.
-
Click the “+” (Add) button in the top toolbar, then select “Add PC.”
-
Enter the connection details:
-
PC Name: Enter the IP address or hostname of the remote machine.
-
User Account: Click “Add User Account” and enter the username and password to save them for future use.
-
Friendly Name (Optional): You can assign a nickname to the connection (e.g., “Office Server”) to make it easier to identify.
-
4. Customize Settings (Optional)
You can adjust some additional settings to enhance your RDP experience:
-
Display: Choose the screen resolution or opt for full-screen mode.
-
Sound: Decide if you want audio to be redirected to your MacBook or stay on the remote machine.
-
Storage: Share specific folders between your MacBook and the remote computer if needed.
These settings are optional but can improve the experience depending on your needs.
5. Connect to the Remote PC
-
Once the PC has been added, it will appear in the Microsoft Remote Desktop app’s main screen.
-
Double-click the name of the PC to initiate the connection.
-
If prompted, enter your login credentials.
-
You are now connected! You can control the remote computer using your MacBook’s keyboard, mouse, or trackpad.
Troubleshooting Tips for RDP on MacOS
If you encounter any issues, here are a few steps to troubleshoot:
-
Check Your Internet Connection: Ensure both your MacBook and the remote computer have stable internet connections.
-
Verify RDP Settings on the Remote Machine: The remote computer must have RDP enabled. On Windows, this can be done in the “System Properties” under the “Remote” tab.
-
Firewall Settings: Make sure the firewall or antivirus software on either machine isn’t blocking the RDP connection.
-
Update the App: Ensure that your Microsoft Remote Desktop app is up to date for the best performance.
Why Use RDP on Your MacBook?
Using RDP on a MacBook provides flexibility by allowing you to work remotely or access essential resources from any location. Whether you need to connect to your personal PC, a company server, or even a virtual machine, RDP ensures that you stay productive and connected, no matter where you are.
Conclusion
Connecting to RDP from your MacBook is a straightforward process when using the Microsoft Remote Desktop app. With just a few simple steps, you can access remote systems, work on projects, or provide support to others without being tied to a specific location. If you need to connect to a remote system regularly, this tool is a great way to enhance your workflow and stay productive wherever you go.


Leave a reply


![]()
The Rubik theme is the best Premium WordPress Themes that perfect for news, magazine, personal blog, etc. It’s never been easier to build a standout website.
